
Use this vendor onboarding checklist to collect, verify, approve, and activate every new vendor so they can start work and get paid without delay. Copy the list below into your intake workflow, then read on for the documents, owners, and acceptance criteria behind each line.
- Submit intake request (Requester) — vendor profile and business justification logged in system
- Check for duplicate vendor (Procurement) — no existing match on TIN or legal name
- Risk-tier the vendor (Procurement) — tier assigned based on spend and data access
- Collect W-9/W-8 tax form (Vendor) — form signed and TIN matches legal name
- Verify certificate of insurance (Procurement) — coverage limits and expiration confirmed
- Run sanctions/restricted-party screening (Compliance) — clean screening result dated and filed
- Validate banking details (Finance) — confirmed through secure portal or callback, not email
- Execute contract or SOW (Legal) — signed agreement on file
- Create vendor master record (Finance/AP) — record active in ERP with all fields complete
- Grant system or site access (Security) — access scoped and logged
- Issue first purchase order (Procurement) — PO issued and acknowledged by vendor
- Conduct 30-day review (Procurement) — invoice match rate and issues checked
Key Takeaways
A compliant vendor onboarding checklist works because it pairs every document requirement with a named owner and a piece of evidence an auditor can verify later.
| Point | Details |
|---|---|
| Assign an owner to every step | Each checklist item needs a responsible role and a clear acceptance criterion. |
| Tier onboarding by risk | Use the 4 Cs framework to match document depth to vendor risk and spend. |
| Verify banking independently | Confirm bank details through a secure portal or callback, never by email. |
| Automate the intake form | A single mandatory-field form with validation cuts email back-and-forth and delays. |
| Track time to onboard | Monitor this KPI monthly alongside documentation completion and invoice match rate. |
Table of Contents
- What Is a Vendor Onboarding Checklist and Why Does It Matter?
- The Complete Step-by-Step Vendor Onboarding Checklist
- What Compliance Checks Actually Matter?
- How Automation Cuts Onboarding Time
- Which KPIs Show Your Onboarding Process Is Working?
- Template Fields and Timeline by Risk Tier
- Rolling Out the Checklist Without the Chaos
- The 4 Cs: Matching Onboarding Depth to Vendor Risk
- Who Handles Onboarding Disputes and Discrepancies?
- Data Privacy Checklist for Vendor Onboarding
- What Actually Moves the Needle in Practice
- Frequently Asked Questions
- Sources
What Is a Vendor Onboarding Checklist and Why Does It Matter?
A vendor onboarding checklist is the ordered set of verification, documentation, and approval steps a company runs before a new supplier can invoice or access systems. Done right, it produces three things: a clean vendor master record, a payment-ready setup, and a documented approval trail an auditor can follow without asking follow-up questions. That last part is the piece most teams skip until an audit forces the issue.
The payoff shows up in four places:
- Compliance — documents like a W-9 and a certificate of insurance are on file before work starts, not chased down after an invoice bounces.
- Fraud reduction — verified banking details close off a common wire-fraud entry point.
- Faster payments — a complete vendor master record means invoices match on the first pass instead of sitting in a query queue.
- Fewer duplicate vendors — a deduplication check at intake keeps your AP system from carrying three records for the same supplier under three slightly different names.
Skip any one of these, and the cost shows up later as a rejected payment run or an auditor's finding, not as a saved afternoon.
The Complete Step-by-Step Vendor Onboarding Checklist
Here's the full sequence, from the moment someone requests a new vendor to the point that vendor is active, paid, and reviewed. Every vendor onboarding checklist worth using assigns an owner and a piece of evidence to each step, not just a checkbox.
- Intake request. A requester submits the vendor's legal name, DBA, expected services, and estimated annual spend. Owner: Requester. Evidence: Completed intake form with business justification.
- Deduplication check. Procurement searches the vendor master by TIN and legal name to catch existing records before creating a new one. Owner: Procurement. Evidence: No match, or match resolved.
- Risk tiering. Assign the vendor to a tier based on spend, data access, and criticality to operations. Owner: Procurement. Evidence: Tier logged in the vendor profile.
- Document collection. Collect tax forms, insurance certificates, banking information, and security attestations in one pass. Collecting everything at intake avoids the rework of chasing missing pieces three weeks later.
- Compliance screening. Run sanctions and restricted-party checks, plus beneficial ownership verification for higher-risk vendors. Owner: Compliance. Evidence: Dated screening result on file.
- Tax and bank verification. Confirm the TIN matches the legal name on the W-9 or W-8, and verify bank details through a secure channel. Owner: Finance. Evidence: Verified banking confirmation, not an email thread.
- Contract execution. Legal reviews and finalizes the statement of work or master services agreement. Owner: Legal. Evidence: Signed contract with correct entity name.
- Finance approval. Finance signs off on payment terms and general ledger coding. Owner: Finance. Evidence: Approval logged with timestamp.
- Vendor master creation. The verified record goes live in your ERP or AP system. Owner: Finance/AP. Evidence: Active record with all required fields populated.
- First purchase order. Procurement issues the initial PO to confirm the vendor is truly operational. Owner: Procurement. Evidence: PO acknowledged by vendor.
- 30-day review. Check invoice match rates and resolve any early friction. Owner: Procurement. Evidence: Review notes and any corrective actions.
Required documents at a glance:
- W-9 (domestic) or W-8 (foreign) tax form
- Certificate of insurance with coverage type, limits, and expiration date
- Signed contract or statement of work
- SOC 2 or ISO 27001 attestation for vendors with data or system access
- Verified banking details, confirmed independently of email
Tailor the depth to the tier. A low-risk landscaping vendor doesn't need a SOC 2 review. A vendor handling tenant payment data does.
The step-by-step onboarding process most finance teams follow breaks down at a handful of predictable points: a name on the W-9 that doesn't match the TIN, a COI that expired last month, or a contract missing a signature page. Catch these at step 4, not step 9, and you avoid a payment held mid-cycle.
What Compliance Checks Actually Matter?
Four checks separate a rubber-stamp onboarding from a real one:
- Tax forms. W-9 for domestic vendors, W-8 series for foreign vendors, verified against the legal entity name.
- Insurance verification. Confirm coverage type, dollar limits, and expiration date on every certificate of insurance before granting site or system access.
- Sanctions and restricted-party screening. Run every new vendor through a screening tool and log the date, the tool used, and the reviewer's name.
- Security and privacy evidence. Require SOC 2, ISO 27001, PCI DSS, or HIPAA attestations when the vendor touches sensitive data, payment card information, or protected health data.
Pro Tip: Never accept bank account details by email, even from a known contact. Route them through a secure vendor portal or confirm them with an independent phone callback to a verified number. This one habit closes off one of the most common vendor-impersonation fraud tactics.
How Automation Cuts Onboarding Time
A single intake form with mandatory fields, file uploads, and built-in tax ID validation does more to shrink onboarding time than any policy memo. Centralizing intake into a self-service vendor portal where vendors upload their own documents cuts the email back-and-forth that stalls most onboarding cycles.
Priority automation features:
- Mandatory-field intake forms that block submission until required documents attach
- Automated tax ID and bank validation
- Sanctions screening built into the workflow, not run manually afterward
- Risk-based routing that sends high-spend vendors to a deeper review path automatically
Integrate with your ERP or AP system first, then layer in vendor master deduplication. Onboarding automation should validate tax IDs, route approvals, and keep an audit trail automatically rather than relying on someone remembering to file the paperwork.
Pro Tip: Don't try to automate everything at once. Start with your highest-volume vendor category, prove the workflow works, then expand.
Which KPIs Show Your Onboarding Process Is Working?
Track a handful of numbers, not a dashboard full of them:
- Time to onboard, tracked from intake to activation, is a metric worth benchmarking monthly to spot process drift.
- Percentage of vendors with a complete intake on the first submission
- Percentage with verified banking before the first invoice
- Outstanding documentation rate at 30 days
- First-cycle invoice match rate
Set a daily queue check for pending intakes, a weekly escalation review for anything stuck past its SLA, and a formal review at the 30-day mark. Assign one owner per metric. Insurance expirations and annual re-checks need an alert system, not a calendar reminder someone forgets.
Template Fields and Timeline by Risk Tier
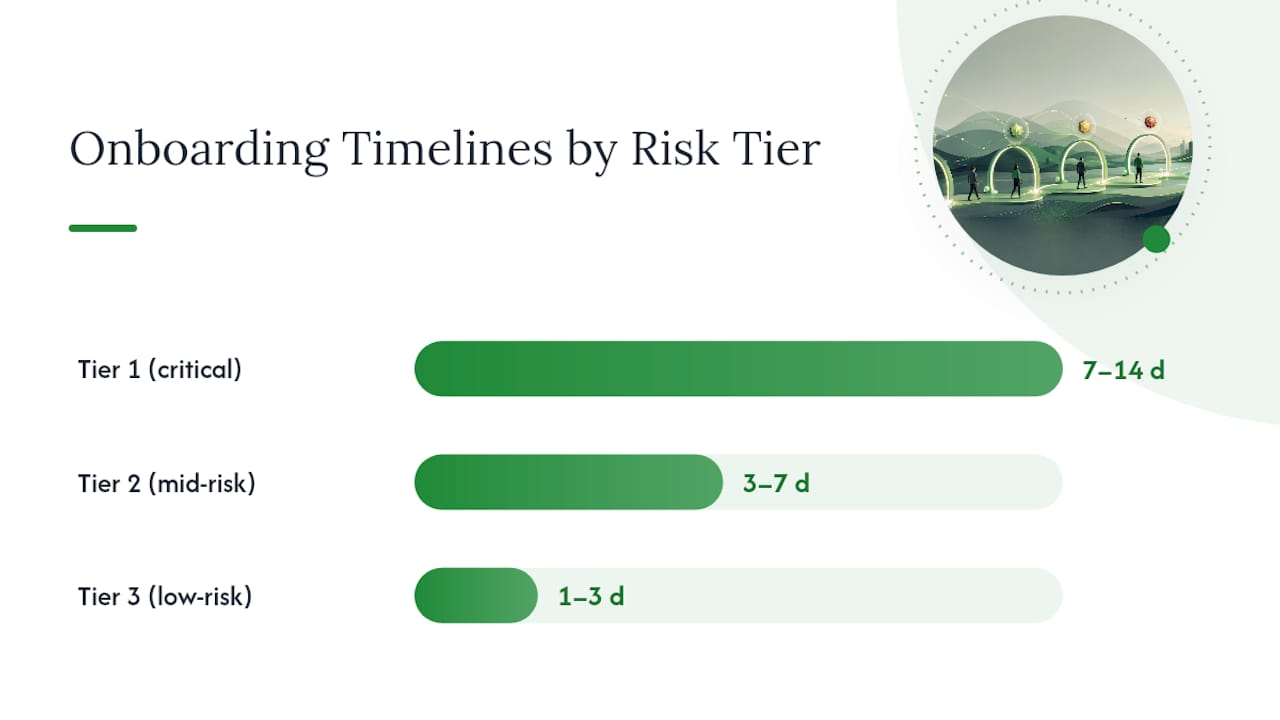
Your intake template should capture legal name, DBA, TIN, remit-to address, services provided, expected annual spend, data access scope, banking information, and COI expiration date, all in one form.
Timelines vary by tier:
- Tier 1 (critical/high-risk): 1 to 2 weeks, given deeper security and financial review
- Tier 2 (mid-risk): 3 to 7 business days
- Tier 3 (low-risk): 1 to 3 business days, consistent with industry benchmarks around a 3-day median setup
The most common cause of delay isn't the paperwork itself. It's missing banking verification and incomplete intake forms that bounce back for corrections. Require a business justification and expected annual spend at intake, which also doubles as your deduplication check.
Rolling Out the Checklist Without the Chaos
Pilot the checklist with one vendor category before rolling it company-wide. Assign a single process owner who fields questions rather than letting five people improvise five versions.
Common mistakes and fixes:
- Scattered communications across email threads — fix with a centralized portal
- Incomplete intake forms — fix with mandatory fields that block submission
- Bank details collected by email — fix with a secure verification channel
- One-size-fits-all onboarding for every vendor — fix with risk tiering
Pro Tip: Give every escalation a named contact and a response window, so a stuck onboarding never sits in limbo for a week because nobody knew whose desk it landed on.
The 4 Cs: Matching Onboarding Depth to Vendor Risk
Four pillars determine how deep an onboarding review should go: Compliance (tax, sanctions, insurance), Classification (risk tier and spend band), Contract (terms, SLAs, signatures), and Control (system access and data handling limits). A Tier 1 vendor handling tenant data needs SOC 2 evidence and a signed data processing addendum. A Tier 3 landscaper needs a W-9 and a COI, nothing more.
Onboarding fails most often when a team treats it as a static stack of forms rather than a dynamic risk-management workflow. The checklist's real job is to create proof: proof of screening, proof of approval, proof someone actually looked.
Who Handles Onboarding Disputes and Discrepancies?
Every checklist eventually hits a snag: a mismatched TIN, an insurance certificate that lapsed mid-review, a contract clause legal won't sign off on. What separates a smooth process from a stalled one is knowing exactly who picks up that problem and how fast.

Set up a three-tier escalation path before you need it. Tier one is the process owner, the single person accountable for the onboarding queue day to day. Route any discrepancy there first, with a response window of one business day. Tier two is the functional lead, whoever owns tax, insurance, security, or legal review for that category of issue. If the process owner can't resolve a compliance mismatch alone, it goes to them within two business days. Tier three is a standing escalation committee, usually procurement leadership plus finance, for anything that risks delaying payment past a contractual deadline or that touches a high-spend vendor.
Publish this path somewhere every requester can find it: a shared document, an intranet page, or inside the intake portal itself. Include names, not just titles, and back up each contact so a vacation doesn't stall a live onboarding.
Log every escalation with a timestamp, the issue, and the resolution. That log becomes part of your audit trail and also tells you, over time, which document type or vendor category triggers the most disputes so you can fix the root cause instead of firefighting the same issue every quarter.
Data Privacy Checklist for Vendor Onboarding
Any vendor touching customer data, tenant records, or payment information needs a privacy review layered onto the standard checklist, not bolted on after access is already granted.
Start by scoping exactly what data the vendor will touch. Will they see full customer records, or just names and addresses for a delivery? Define that scope in writing before onboarding proceeds, because "access to everything, just in case" is how a minor vendor breach turns into a major one.
Require a signed data processing agreement for any vendor with access to personal or financial data. This should specify how data is stored, how long it's retained, whether it's shared with subcontractors, and what happens to it when the contract ends. Ask directly: is data encrypted at rest and in transit? Where are servers located, and does that location create a regulatory conflict with where your customers live?

For vendors handling payment card data, require PCI DSS attestation. For healthcare-adjacent vendors, require HIPAA compliance documentation. For vendors processing data from EU residents, confirm GDPR-compliant data handling terms are in the contract, not just implied.
Build a deletion or return clause into every vendor contract covering data. When the relationship ends, you need contractual proof the vendor destroys or returns your data, not a verbal assurance. File that clause alongside the signed contract so it's part of the same audit trail as your insurance and tax documentation.
What Actually Moves the Needle in Practice
The teams that see real gains centralize intake into one portal, assign a single owner, and route vendors by risk instead of running every supplier through the same twelve steps. A landscaping vendor and a data-processing vendor don't belong on the same checklist depth. Measure ROI in fewer stuck invoices and shorter time-to-onboard, not in forms collected.
Frequently Asked Questions
What is a vendor onboarding checklist used for? It's the ordered set of verification and approval steps that gets a new vendor from initial request to active, payment-ready status while creating an auditable record of each check completed.
How long does vendor onboarding typically take? Low-risk vendors usually complete onboarding in 1 to 3 business days, while high-risk vendors requiring deeper security and compliance review can take 1 to 2 weeks.
What documents should be included in a supplier onboarding checklist? At minimum, collect a W-9 or W-8 tax form, a certificate of insurance with verified coverage and expiration, signed contract terms, and verified banking information.
Who should own the vendor onboarding process? Assign one process owner, typically in procurement, who coordinates across finance, legal, security, and compliance rather than letting the process run through scattered emails.
How do you prevent duplicate vendor records? Run a deduplication check against the vendor master by legal name and tax ID at intake, before creating any new record.
What's the difference between a contractor onboarding checklist and a general vendor onboarding checklist? A contractor onboarding checklist typically adds specific attention to certificates of insurance, licensing, and on-site safety documentation, while a general vendor checklist covers a broader range of suppliers with less physical site access.
Sources
- Vendor Onboarding Checklist
- Vendor Onboarding: A Step-by-Step Process for Finance Teams
- Supplier onboarding and vendor onboarding: A guide | Stripe
- Vendor Onboarding Process: A Practical Guide for Procurement Teams
- The monthly metric: time to on-board a new supplier | ISM
Property owners managing vendors across multiple homes or rentals can centralize contacts, documents, and renewal alerts with Property Command Center's vendor tools, keeping certificate of insurance expirations and contractor records in one dashboard instead of scattered folders. Set up task reminders for renewal deadlines, and check pricing plans to find the tier that fits your property count. For vendors serving compliance-heavy trades, resources like commercial electrical compliance guidance show what a thorough documentation standard looks like in practice.